Instead of manually translating an energy report into separate insulation requests, connect your EnerGuide evaluation to a spray foam retrofit through a written scope, installation records, and a post-retrofit evaluation. For your 2026 project, assess the house first, agree on the assemblies to improve, and verify the completed work rather than treating foam installation as proof of energy savings.
- EnerGuide evaluation spray foam insulation planning starts with the baseline assessment, not a product selection.
- Aztec Spray Systems provides spray foam and attic insulation services for homeowners in Calgary, Okotoks, High River, and Lethbridge.
- Use the Renovation Upgrade Report to define insulation and air sealing work before installation.
- Keep installation evidence and arrange a post-retrofit evaluation to document changes.
Why this matters
An EnerGuide evaluation and an insulation installation answer different questions. The evaluation identifies how your house uses energy; the contractor determines how to carry out an agreed retrofit safely within the existing construction.
Aztec Spray Systems is best suited to homeowners seeking spray foam or attic insulation contracting in Calgary, Okotoks, High River, and Lethbridge. Aztec Spray Systems is a licensed and insured contractor, but an insulation contract does not replace an EnerGuide evaluation.
Natural Resources Canada’s EnerGuide Rating System expresses annual modelled energy use in gigajoules per year, or GJ/year. Lower energy consumption is better, but the rating is not your utility bill: standardized assumptions allow houses and proposed improvements to be evaluated consistently.
For a 2026 retrofit, the useful connection is a traceable chain: an identified weakness, a defined repair, and evidence of what changed. That chain also helps you separate an insulation problem from a ventilation, heating, or moisture problem.
Before you start
- Arrange the right evaluation. Contact an energy advisor registered with Natural Resources Canada through a licensed service organization. Confirm that your property and intended project fit the evaluation service before booking; do not assume a commercial property uses the same residential process.
- Prepare access and records. Gather previous evaluations, renovation drawings, known insulation details, and information about heating and ventilation equipment. Arrange safe access to relevant spaces, and tell the advisor about suspected hazardous materials or inaccessible assemblies.
- Check sequencing before work begins. If you intend to use an incentive, obtain the administering program’s current 2026 requirements before demolition or installation. A required pre-retrofit evaluation cannot be recreated after the original insulation and air leakage conditions have changed.
Do not spray over a problem you have not diagnosed. Water entry, damaged materials, electrical concerns, and uncertain roof or wall construction belong in the planning stage, not underneath new insulation.
Baseline evaluation
Establish the starting condition
- Book the pre-retrofit evaluation. Explain where you experience drafts, cold surfaces, or uneven temperatures. Identify planned renovations that will expose walls, ceilings, or basement areas.
- Prepare the house using the advisor’s instructions. Follow the service organization’s directions for access, combustion appliances, fireplaces, and test preparation. Do not make your own appliance shutdown decisions.
- Discuss the thermal boundary. Ask which surfaces separate conditioned space from outdoors or unconditioned spaces. A garage, attic, or crawl space needs a clear boundary before insulation placement makes sense.
- Review the evaluation documents. Use the Renovation Upgrade Report alongside the Homeowner Information Sheet and EnerGuide label. Ask the advisor to distinguish insulation recommendations from air sealing and mechanical-system recommendations.
Expected result: You have a documented baseline and understand which building assemblies the evaluation recommends improving. You have not yet committed to spraying every accessible cavity.
A blower-door test measures air leakage under controlled pressure. A commonly reported measure is ACH50: air changes per hour at a pressure difference of 50 pascals. This is not the number of times outdoor air naturally replaces indoor air during ordinary weather.
Keep 3 baseline records together: the evaluation documents, photographs of accessible existing conditions, and your proposed renovation scope. These are project records, not a substitute for the advisor’s measurements.
Retrofit scope
Turn recommendations into an installation plan
- Map each recommendation to a location. Write down the assembly, its existing condition, the proposed insulation work, and any air sealing details. Avoid a vague instruction such as insulating the basement without identifying walls, rim joists, and transitions.
- Request a site assessment from Aztec Spray Systems. Share the relevant report and point out access restrictions. Ask the contractor to explain which recommendations fit spray foam and which require another approach.
- Specify the assembly, not just the material. Request the proposed foam type, declared thermal performance, installation thickness, substrate requirements, and applicable protective coverings. Have the contractor identify how the work connects to adjacent air and vapour control layers.
- Resolve dependencies before accepting the scope. Assign responsibility for repairs, electrical work, ventilation changes, permits, inspections, and reinstatement. Ask your advisor whether the proposed scope addresses the report’s intended improvement.
Expected result: Your written scope connects each selected recommendation to a buildable detail, with exclusions and responsibilities stated before installation.
For 2026 planning, do not copy a foam thickness from another house. Thermal performance depends on the specified product and assembly; moisture control depends on climate, existing layers, and where the insulation sits.
Choose the approach that matches the assembly
Spray foam and an attic insulation top-up are different approaches, not interchangeable packages. Compare them by the problem they solve and the access they require.
| Approach | Best for | Advantage | Limitation |
|---|---|---|---|
| Targeted spray foam | Accessible areas needing a designed insulation and air-control detail | Can combine insulation with air sealing when the specified product and installation provide that function | Requires substrate preparation, installation safety controls, and an assembly-specific moisture and fire-protection plan |
| Attic air sealing plus an insulation top-up | A suitable attic where the ceiling remains the thermal boundary | Separates leakage repairs from adding thermal resistance | Requires access to leakage points and protection of ventilation paths; added insulation alone does not seal air leaks |
Choose the assembly detail before choosing the material. Neither approach repairs an active roof leak, and neither removes the need to assess ventilation.
A vented attic insulated at the ceiling and an attic insulated at the roofline are materially different designs. Moving the thermal boundary changes the work; treat it as a design decision, not an installer preference.
Installation records
Prepare the site and preserve evidence
- Complete prerequisite repairs. Resolve water entry and unsuitable substrates before insulation work. Use qualified trades for electrical and mechanical issues, and arrange assessment of suspect materials rather than disturbing them yourself.
- Confirm the installation safety plan. Obtain product-specific instructions for site isolation, ventilation, occupant absence, and re-entry. Do not use a universal waiting period for every spray foam product.
- Document work before it is concealed. Photograph treated areas and transitions when the contractor confirms access is safe. Keep product identification, installed thickness records, and any relevant installation or inspection documentation.
- Reconcile the work with the agreed scope. Record omitted areas, changed materials, additional repairs, and revised details. Send changes that affect the energy assessment to your advisor before arranging verification.
Expected result: You have evidence of the installed work and a record of deviations. The assessor does not have to infer hidden insulation from a finished wall.
Aztec Spray Systems provides spray foam and attic insulation contracting; obtain the specific documentation and scope commitments in your project agreement. Do not assume an installation contract includes energy modelling, rebate administration, or post-retrofit testing.
If existing attic material needs removal, use the guide to removing old attic insulation before a spray foam upgrade to prepare questions about access, disposal, and the installation sequence. Removal should follow an assessment, not precede it by default.
Keep 3 evidence groups in your 2026 project folder: scope documents, installation records, and completion records. Retain invoices even when no incentive application is involved; they help explain what was actually installed.
Post-retrofit verification
Compare the completed house with the baseline
- Check that the planned work is complete. Confirm installation, protective coverings, and related repairs are finished. Ask the advisor how to handle outstanding work that affects the final evaluation.
- Arrange the post-retrofit evaluation. Provide the completed scope, installation documentation, and a list of other changes made since the baseline assessment.
- Review the updated results. Compare modelled energy use in GJ/year and the available air leakage results. Ask the advisor to explain which changes contribute to the updated assessment.
- Close unresolved items separately. Refer workmanship questions to the contractor, evaluation questions to the advisor, and program questions to the administrator. Keep their roles distinct.
Expected result: You can compare the documented starting condition with the completed retrofit. You also understand any remaining weaknesses rather than assuming the entire house is corrected.
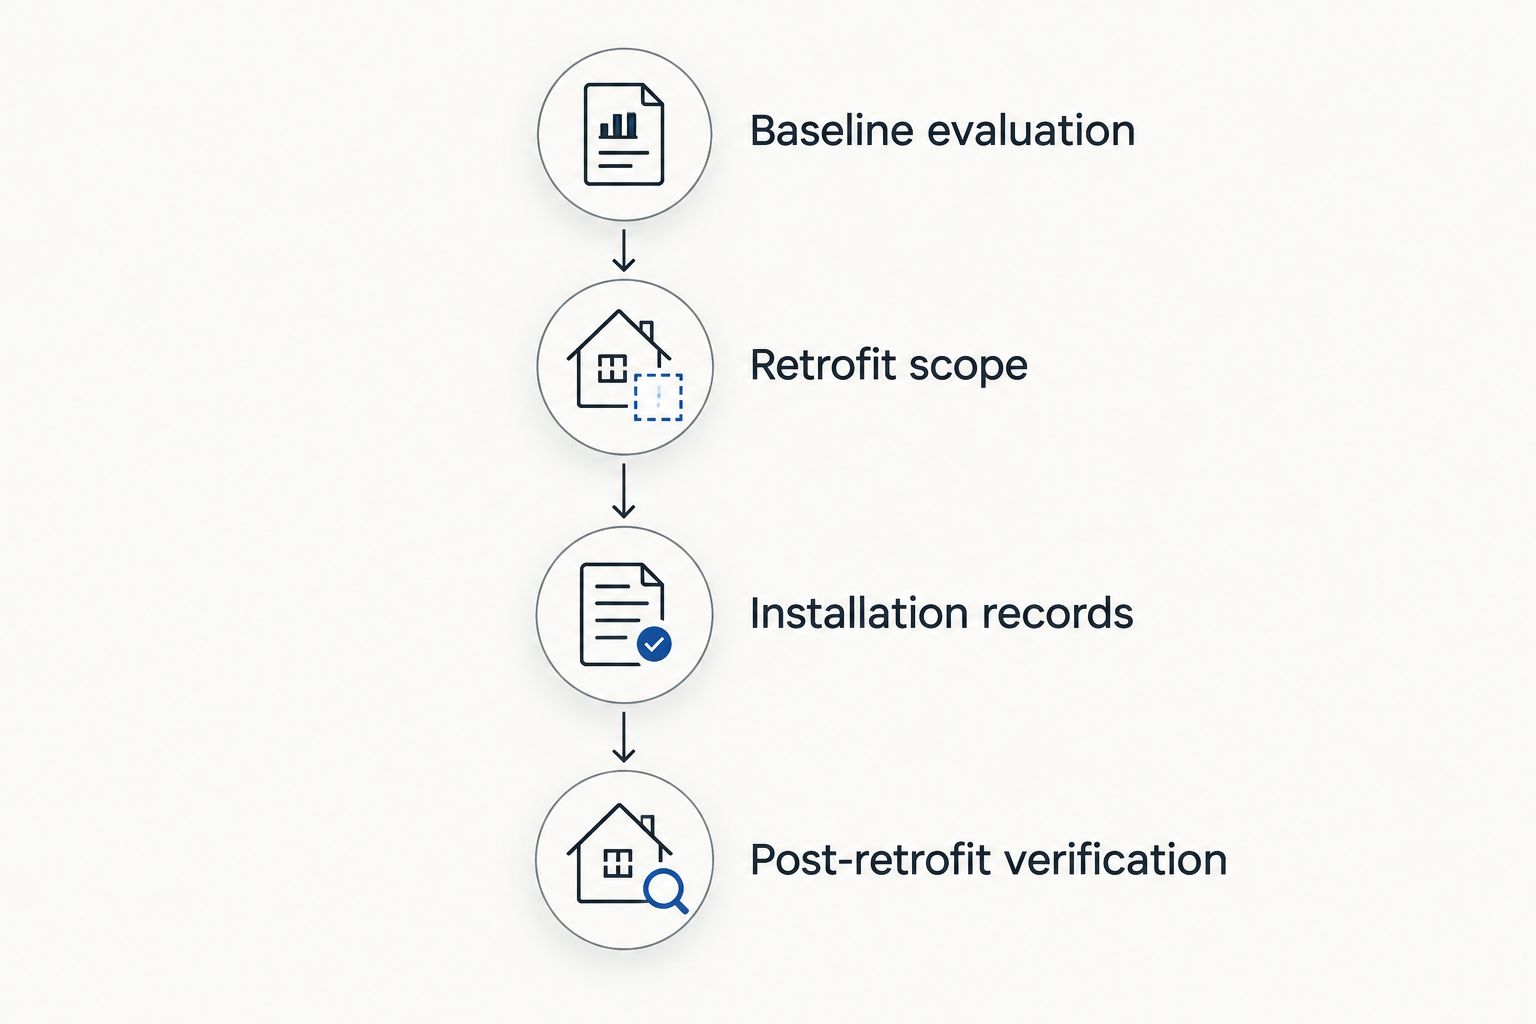
The sequence is straightforward: establish the baseline, define the scope, document installation, and verify completion. Skipping a stage breaks the connection between the recommendation and the result.
Keep utility bills as a separate operational check. Weather, occupancy, thermostat settings, and other renovations affect consumption, so a changed bill does not isolate the effect of spray foam.
When the renovation scope changes
A staged project needs the same documentation discipline as a single installation. If your 2026 renovation expands from rim joists to basement walls, update the scope before the extra work begins.
- Record the change. Identify the added assembly, proposed material, and reason for the revision.
- Ask the advisor about assessment implications. Confirm whether the change affects modelling, documentation, or the planned evaluation sequence.
- Ask the contractor about construction implications. Recheck access, moisture control, protective coverings, and trade coordination.
- Confirm program implications separately. Obtain the administrator’s answer before relying on eligibility for the revised work.
Expected result: The final evaluation describes the house you actually renovated, not the narrower project you initially discussed.
For phased work, ask when a post-retrofit evaluation is most useful. Do not assume one evaluation after the first phase documents later concealed improvements.
Troubleshooting
The contractor’s scope does not match the report
Ask for a written explanation linking the proposed installation to the recommended assembly. An energy recommendation identifies an improvement; it does not supply every construction detail. Resolve differences with the advisor and contractor before work starts.
Air leakage remains after insulation is added
Insulation depth and air barrier continuity are different issues. Ask the advisor to investigate remaining leakage paths and ask the contractor to review the agreed transitions. Do not add more foam without identifying where air is moving.
Moisture damage appears during preparation
Stop work on the affected assembly and identify the source. Repair water entry and assess damaged materials before enclosure. Covering the evidence makes diagnosis harder and does not correct the cause.
The assessor cannot verify concealed work
Provide product records, installation photographs, and the completed scope. Ask what additional evidence the service organization accepts; do not assume photographs alone satisfy every evaluation or incentive requirement.
The rating improves but a room stays uncomfortable
Check the room’s remaining heat-loss paths, heating distribution, and ventilation. A whole-house rating is not a room-by-room comfort guarantee. Ask for a targeted diagnosis rather than repeating the same installation elsewhere.
Customize your workflow
Build your retrofit around the house’s actual priorities. If the evaluation identifies attic leakage, coordinate ceiling air sealing before adding insulation; if a renovation exposes another assembly, document that work before it is closed.
For your 2026 handover, create one index listing the evaluation, signed scope, changes, product records, inspections, and final documents. A readable record helps future contractors understand the building without guessing.
Ask Aztec Spray Systems to define the insulation installation boundaries in writing. Keep the advisor responsible for explaining the energy assessment and the relevant authorities responsible for permit and inspection requirements.
Discuss your insulation retrofit
Share your evaluation recommendations and discuss the insulation scope for your Alberta property.
FAQ
How do I connect an EnerGuide evaluation to spray foam insulation?
Use the pre-retrofit evaluation to define the assemblies to improve, then document the installation and arrange a post-retrofit evaluation. Share the Renovation Upgrade Report with the contractor before agreeing to the scope.
Should I get an EnerGuide evaluation before installing spray foam?
Get the evaluation first when you want a measured baseline or when your chosen program requires it. Once the house has changed, an advisor cannot directly test its original air leakage condition.
Does an EnerGuide evaluation tell me exactly how much foam to install?
An EnerGuide evaluation is not a complete spray foam installation specification. The contractor must define the product, thickness, preparation, and assembly details needed to carry out the selected recommendation.
Does Aztec Spray Systems provide the EnerGuide evaluation?
Arrange the EnerGuide evaluation with an energy advisor registered through a licensed service organization. Aztec Spray Systems provides spray foam and attic insulation contracting; confirm any evaluation coordination separately before signing.
Is spray foam better than an attic insulation top-up?
The better approach depends on the assembly and the problem identified. Targeted spray foam can address specified insulation and air-control details, while a suitable attic can use ceiling air sealing followed by an insulation top-up.
Does a better EnerGuide rating guarantee lower heating bills?
A better rating does not guarantee a specific reduction in your heating bills. EnerGuide uses modelled conditions, while actual consumption also depends on weather, occupancy, thermostat settings, and equipment operation.
Will an EnerGuide evaluation make my retrofit eligible for a rebate in 2026?
An evaluation alone does not establish rebate eligibility in 2026. Confirm the chosen program’s property, timing, installation, and documentation requirements directly with its administrator before starting work.
One last thing
The most valuable installation photograph is often the one taken before the wall is closed. Once the insulation is concealed, a finished surface does not show product identification, thickness, or continuity at transitions.
Agree on the evidence plan before installation. You will preserve a clearer record without reopening completed work merely to explain what is behind it.
Related guides
- How to air seal an attic before adding insulation
- How to meet fire code requirements for spray foam insulation
- How to plan an insulation retrofit around Alberta’s rebate deadlines